Broken Sword Walkthrough: Embark on an exciting journey through this classic animated adventure game, Broken Sword. Follow our comprehensive walkthrough for the PC version released in 2001. Learn essential tips and tricks, including the use of the right and left-click buttons for immersive gameplay and conversations. Explore different routes, accomplish critical tasks, and overcome challenges along the way. Need help? Call Nico on the nearest telephone. Get ready for an outstanding gaming experience!
Introduction of Broken sword walkthrough
In this Broken Sword walkthrough, we delve into the captivating story of George Stobbart, a young Californian vacationer who becomes the unexpected protagonist in The Shadow of the Templars mystery. Join George as he sits outside a Parisian café, feeling disheartened by the perceived indifference of the French. However, a tragic explosion suddenly alters his plans and forever changes his life. Follow our guide to navigate the intriguing narrative and uncover the secrets that lie within this extraordinary adventure game.
Chapter One – Paris: Cafe de la Chandelle Verte – Walkthrough
Part 1: Unraveling the Mystery at the Cafe
In this section of the Broken Sword walkthrough, we dive into the thrilling events that unfold at the Cafe de la Chandelle Verte in Paris. Witness George Stobbart, our hero, enjoying a casual moment outside the cafe. Suddenly, an old man carrying a briefcase enters with an attractive waitress in a red dress. However, their encounter is interrupted by a peculiar clown with a leering face who disappears inside, leaving behind an accordion.
Tragically, the accordion turns out to be a bomb, causing a devastating explosion. The old man loses his life, the waitress is dazed, and George finds himself knocked down. Recovering quickly, George rushes into the cafe to assist in any way he can.
Assuming George’s identity, examine the body of the old man and engage in conversation with the confused waitress. When she requests a drink, provide it to her and discuss various topics. She reveals that the clown laughed at the old man and snatched his briefcase before fleeing. It appears that the old man was expecting someone.
Leave the cafe and head to the nearby street lamp. Retrieve the NEWSPAPER from under a chair on the sidewalk. Notably, there’s a note written in the newspaper: “Salah…eh Dinn, thirteen forty-five.”
Turn around and return to where a man is digging. However, you’ll be halted by Officer Moue, a policeman who questions you. Later, Inspector Rosso will conduct a thorough investigation at the cafe. Answer his inquiries truthfully, and he will allow you to continue your vacation. Before parting ways, Inspector Rosso gives you his CARD.
Outside the cafe, speak with Officer Moue and exhaust all conversation options. Then, approach Nico, a photojournalist from La Liberte, who can be identified by her camera. Engage in dialogue with Nico, exploring all available choices. She confesses that she was supposed to meet the old man, Plantard, at the cafe. Nico provides you with her telephone number and departs to develop the pictures she took.
Return to the man who was digging in the street and resume your interrupted conversation. Discuss all relevant matters with him. Once the conversation concludes, offer the workman the newspaper you found. He learns about an important horse race and promptly leaves.
After he departs, obtain the T-SHAPED TOOL from the toolbox in the nearby construction tent. Additionally, examine the other toolbox situated beside the dirt pile. It will grant you access to your notes, written on an envelope.
Note: To view the game map, walk to the right and click on the display. However, for now, remain in this area. Click on Cafe de la Chandelle Verte on the map to exit.
Head back toward the cafe, then go to the right and enter an alley. Attempt to use your T-shaped tool on the barred window, but it won’t work. However, check the garbage can against the rear wall on the left for a surprising discovery! The T-shaped tool might be useful on the manhole cover behind you. Give it a try. (It’s quite impressive how George can conceal an item of this size and discomfort!)
Enter the malodorous sewer. Once at the bottom, move to the right and pick up a red plastic ball, which happens to be a CLOWN NOSE. Proceed further into the sewer, heading to the right, and find a SODDEN TISSUE. Next, locate a SCRAP OF MATERIAL on the fence near the ladder. Finally, climb up the ladder to encounter a mustachioed man in short pants who had previously chased an intruder. Engage in conversation, exploring all available options.
After leaving the garden, you’ll find yourself back in the street near the workman’s area. Turn around and knock on the courtyard door once again. When the elderly gentleman appears, present him with Inspector Rosso’s card. Engage in a comprehensive conversation with him, discovering his significant interest in the cafe waitress. Moreover, you learn that the clown had the briefcase when the old man last saw him.
Show the old gentleman the scrap of material, revealing that it matches the clown’s jacket. Unfortunately, the old man no longer possesses the jacket he took from the clown. Conclude the conversation, then approach the toolbox beside the dirt pile and review your notes. You’ll find the name “B. Todryk” and the telephone number “74-98-08-59” added to your notes. Todryk is the clown’s tailor, as disclosed by the old gentleman.
Using the pointing finger icon, select Nico’s telephone number at the top of the envelope. Call Nico and discuss the situation with her. (Note: Nico’s address is 36 Rue Jarry.) After the phone conversation, walk to the right and select Rue Jarry on the map.
Part 2: Rue Jarry – Broken Sword Walkthrough
In this part of the Broken Sword walkthrough, we continue our journey in Rue Jarry. Begin by speaking to the elderly lady knitting next to the flower cart. Inquire about the flowers, Nico, and fortune telling. Once the conversation concludes, cross the street and enter the apartment building, making your way to Nico’s apartment. Watch the subsequent cutscene and proceed to show the scrap of material to Nico. It is revealed that the clown bomber bears a distinctive horseshoe-shaped scar on his face. Nico will hand you the PHOTOGRAPH she has taken.
Now, show Nico the sodden tissue. While she finds it disgusting, you learn that it is covered in theatrical makeup. Proceed to show Nico the clown nose and inquire about the costume rental agency from which it originated. After examining the inventory, ask her about Plantard, the clown, and herself. Utilize the telephone to call the tailor, Todryk. Inquire about tracing a customer and engage in a conversation regarding the picture, Plantard, and the clown. Although the discussion with Todryk may seem unproductive, inform Nico that you plan to visit the costume shop. Leave the apartment and access the map by going to the left on the street. Select “La rise’e de monde” on the map.
Part 3: La Risee de Monde – Broken Sword Walkthrough
In this section of the Broken Sword walkthrough, we explore La Risee de Monde costume shop. Enter the shop and engage in a conversation with the proprietor. Inquire about the clown nose, the photograph, and the soiled tissue. Proceed to show him the picture of the scar-faced man. Then, discuss Plantard and the clown with the proprietor. As a reward, you will receive a PALM BUZZER and share a good laugh.
Note: Before leaving the shop, ensure that the proprietor has informed you about Monsieur Kahn and the pixie costume. Click on the soiled tissue and the photograph to confirm.
If you have the time, feel free to explore the entire shop. Take a look at the clown costume by the door and the Victorian lady costume. You can also play the phonograph for added entertainment.
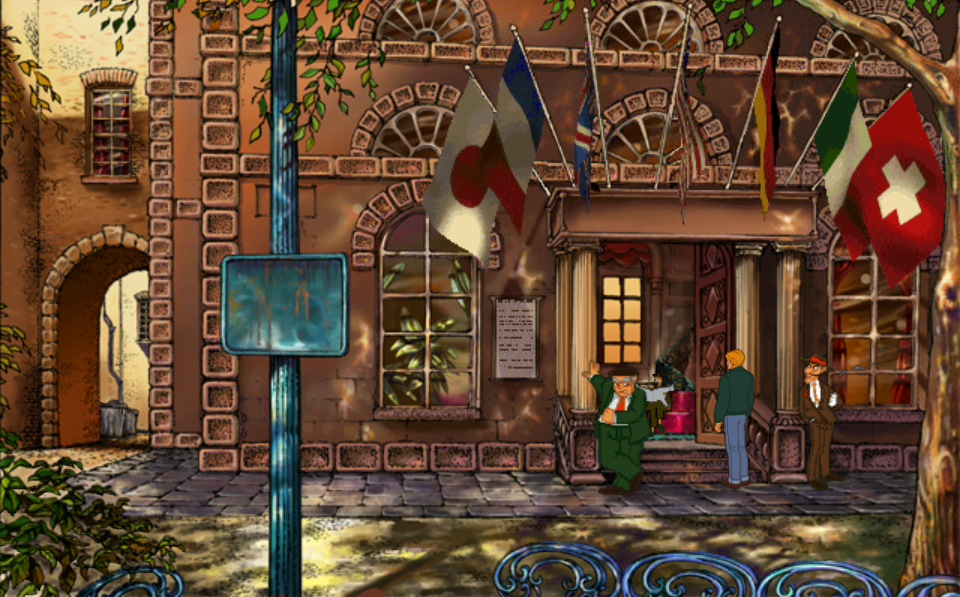
Part 4: Hotel Ubu – Broken Sword Walkthrough
In this part of the Broken Sword walkthrough, we explore Hotel Ubu. As you climb the stairs, observe two suspicious-looking characters near the front entrance of the hotel. Inside, engage in a conversation with Lady Piermont. Inquire about her and then show her the picture of the scar-faced man. She identifies him as “Moerlin,” a fellow guest at the hotel. Progress! Ask Lady Piermont about the clown nose. Then, ask her about the scar-faced man until the corresponding icon disappears. Lastly, ask her about herself again, and she will share her bitter disappointment in finding the man she has been waiting for all her life.
Excuse yourself from Lady Piermont’s company and proceed to the front desk. However, you won’t be able to speak with the gentleman reading the newspaper just yet. Your main objective is to gain access to the safe and the mysterious documents. While at the front desk, look toward the rear screen and notice a blue key hanging on the board. It seems like a likely target for George.
Attempt to take the key from the board, but the desk clerk will stop you. Engage in a conversation with him about the safe, the key, Plantard, and the clown. Discover that the key belongs to Room 21, which is currently empty but reserved. Interesting.
On your way back to Lady Piermont, take a moment to talk to the gentleman with the newspaper, who happens to be a Nobel Prize winner. Could he be in the same danger at Hotel Ubu as Plantard was at the cafe?
Next, speak with Lady Piermont and inquire about the key. Strike a deal with her to distract the desk clerk. While Piermont performs her distraction, seize the opportunity to take the KEY. Proceed directly up the stairs. You know that the scar-faced assassin, Moerlin, is staying in the second room on the right side, according to Todryk the tailor. Entering the first room on the right side might help you gain access to the next room. Check the sign on the door by attempting to enter. Yes, it’s Room 21. Use the key to unlock the door and enter.
Feel free to snoop around the room, examining the armoire and the bedside table. However, your main objective is to exit through the bedroom window. Be cautious, as one false move could be disastrous! Carefully move along the ledge to the right until you can climb into the assassin’s window.
Open the door to the hallway and witness the scar-faced assassin arriving. Automatically hide in the armoire while he changes his clothes and leaves the room again. Phew!
Inspect the room further. The only accessible item apart from the clown pants on the bed is the bedside table. Search the clown pants to discover Moerlin’s PASS CARD and an intriguing MATCHBOOK.
Now that you have Moerlin’s pass card in your possession, return to the lobby and inquire about the safe in the back room from the desk clerk. If the desk clerk isn’t present, click on the back room, and he will come out. Show him Moerlin’s pass card, and he will talk to you but still won’t allow you to see the contents of the safe.
Return to Lady Piermont once again. Show her Moerlin’s pass card. Fueled by her anger at Moerlin’s rejection, she intervenes with the clerk on your behalf. The desk clerk obliges and retrieves the manuscript from the safe.
Once you have the MANUSCRIPT in your inventory, go upstairs. Enter the first room once more and climb out onto the ledge. Use the magnifying glass icon to throw the manuscript out into the alley.
Proceed back inside, go down to the lobby, and exit through the front entrance. On your way, you’ll be stopped by the two thugs, Guido and Flap, who were clearly stationed there by Moerlin. Flap will search you. Fortunately, you followed my advice and got rid of the manuscript out the window.
Return to the alley and collect the manuscript. You will find yourself in Nico’s apartment. Nico informs you that the medieval manuscript is somehow connected to the ancient order of the Templars.
After learning about the Templars, view the manuscript at the bottom of the screen and review the meaning of each icon. You can refer to it periodically as you gather additional information, but it’s not necessary to do so frequently to complete the game successfully.
Part 5: Crune Museum – Broken Sword Walkthrough
In this part of the Broken Sword walkthrough, we visit the Crune Museum. Enter the museum and engage in a conversation with the guard. Inquire about Andre Lobineau, the Knights of the Templars, and the manuscript. Unfortunately, Lobineau is not present at the museum, and the guard has no knowledge regarding the matter.
Explore the exhibits in the display area, eventually reaching the peculiar triangular object in the central glass case. It bears a striking resemblance to the tripod depicted in the Templar manuscript. Could this be significant?
Return to Nico’s apartment. Have a discussion with Nico about Professor Peagram and Lochmarne. If needed, revisit the icons on the manuscript for further familiarization. Once you have finished speaking with Nico, leave her apartment and head to the Aeroport on the map. When the Europe map appears, click on Lochmarne.
Chapter Two Ireland
Part 1: The Pub – Broken Sword Walkthrough
In this part of the Broken Sword walkthrough, we find ourselves in a pub in Ireland. Start by talking to the young man leaning against the building, Liam McGuire. Despite his appearance, McGuire doesn’t seem to know much about the truth. Ask him about Peagram, the dig, Lochmarne, the clown, and the ghost. After the conversation with McGuire, enter the pub.
Proceed to the right of the screen and talk to the old man who appears to have a bad cold. Inquire about Sean Fitzgerald, the ghost, and the beer. While conversing with him, pay attention to the fact that he leaves a PIECE OF WIRE on the table when he sneezes. Quickly grab the wire when he puts it down. Make sure you talk to him about everything.
Next, approach Sean Fitzgerald at the center table and discuss beer, the dig, the gem, Peagram, and Lochmarne with him. Move on to Pat, the man sitting at the bar in the lighter gray shirt. Inquire about Peagram, the dig, the gem, Fitzgerald, and Lochmarne. As a gesture of goodwill, buy Pat a beer. While he takes a sip, discreetly takes the green bar towel under his right elbow. Ensure you do this while George is standing directly in front of Michael, the bartender/owner. You can see a corner of the green towel on the bar between George and Pat when Pat lifts his elbow.
Return to Fitzgerald and talk to him again, specifically about the dig. He denies ever working there and accuses Pat Doyle of being a liar.
Move to the rear screen and speak with O’Brien, who is sitting on the end bar stool by the window. Ask him about Peagram, Michael, the gem, Lochmarne, the tripod, and the ghost. Afterward, go back outside and talk to McGuire again, this time about the dig, Fitzgerald, and the gem. It appears that Peagram gave Fitzgerald a package that he is quite nervous about.
Return inside and approach Fitzgerald once more. Inquire about the dig, Peagram, the package, and Jacques Marquet. Suddenly, Fitzgerald jumps up and runs out of the pub. Screeching brakes can be heard outside. McGuire rushes into the pub to inform everyone that Fitzgerald has been struck by a red sports car.
Go outside and have a conversation with McGuire. He reveals that Fitzgerald was hit and pulled into the car by “a bloody pixie.” Ask McGuire about the pixie and Fitzgerald.
Now, recall the cutscene where you saw the pixie’s red sports car bumping into the pub wall, dislodging a small compartment hatch. Look at it now, to the left of the pub’s entry. The inner mechanisms are exposed. What could those switches be for? One of the handles comes off when George touches it. Uh-oh!
Return inside and ask Michael for a beer. You’ll need one in this situation. However, if you ordered a beer earlier, finish it first before trying to get another one. Michael discovers that the beer taps aren’t working. Ah, so that’s what you broke. He mentions the glass washer, which can be seen vibrating behind the bar.
At this point, show Michael your electrician’s ID card. Since the glass washer has stopped, he wants you to take a look at it first to prove your skills before you can attempt to fix the beer pumps. Walk around to the back of the bar and use the piece of wire from your inventory on the electrical outlet for the glass washer. This will only work if you have specifically talked to the sneezing old man about this wire and its purpose (unpleasant as it may be). If you didn’t gather that information earlier, go talk to him about it now.
Once you have successfully replaced the fuse with the wire, you’ll have a conversation with Michael about fixing the beer pumps in the cellar. He will step back to the bar, allowing you to enter the doorway to the cellar. Proceed to the lever on the cellar wall to the right of the screen and pull it. Return to the bar and then go out onto the street. Open the grate on the sidewalk. Kahn will approach you, asking about a small package. When he leaves, go back to the pub’s cellar. You will automatically pick up the FLASHLIGHT, the GEM, and engage in a conversation with McGuire above, discussing free beer and his reconnaissance on the bad guys. Take the green bar towel from your inventory and wet it under the utility sink’s faucet.
Leave the pub and walk to the right of the screen, passing the corner of the pub and going up the hill through the gate posts.
Part 2: Lochmarne Castle – Broken Sword Walkthrough
In this part of the Broken Sword walkthrough, we arrive at Lochmarne Castle. Start by talking to the farmer lounging on the hay wagon. Inquire about Peagram and the red sports car, as well as Fitzgerald. It seems that everyone believes Peagram ran off with the gem, but we know better, don’t we? Ask the farmer about Fitzgerald and his whereabouts.
Once the farmer has left to search for Fitzgerald, climb up on the stacked hay bales. However, you won’t be able to reach the top of the stone wall. Find a crack next to George’s left hand and use the manhole key in the hole. Voila! A new step is revealed. Then, use the forward cursor on top of the wall to climb over and descend into the courtyard on the other side. Uh-oh! There’s a menacing white goat standing guard. It seems this goat was placed here to prevent anyone from entering the excavation area where the ladder is located, back and left of the stairs. Guard goat, who knew?
SAVE YOUR GAME! Engage in a conversation with Billy the goat.
Avoid approaching the hay rake to the left of the goat, or Billy will knock you out! Instead, head toward the ladder that leads down into the excavation. Billy will immediately knock you down. Quickly get up and click on the hay rake to the left. George will run over and move the hay rake, causing Billy to get his rope caught and preventing him from reaching George. He may be angry, but he’s now harmless.
Approach the excavation ladder. The archaeological dig awaits!
Enter the excavation. In the chamber beneath the courtyard, examine the large door at the rear of the screen. Look to the left of the door at a peculiar set of indentations in the niche on the wall. Proceed to the side table and inspect the small sack. Take some PLASTER OF PARIS from the sack.
There is a small idol standing to the left of the steps in front of the door (it may be difficult to see). Knock down the idol, pick it up, and notice the small holes in the sand. Pour some plaster of Paris into the holes and wring out the green bar towel, which is filled with water, to wet the plaster. If the towel has dried out too much, go back to the pub’s cellar and wet it again as needed.
Note: If you didn’t turn off the faucet after wetting the bar towel the first time when you obtained the gem and the flashlight, you won’t be able to wet the towel sufficiently to dampen the plaster in the excavation. You’ll be going back and forth to the excavation, struggling to wet the towel adequately. So, make sure to turn off the water after using it.
Once you have successfully wet the plaster of Paris in the holes in the sand, pick up the PLASTER CAST from the sand. Use the plaster cast on the left wall beside the door, where you found the small holes. When the door opens, enter the cavern.
After returning to Nico’s apartment, have a conversation with her about the Templar’s gem. Then, make your way to the police station.
Part 1: Police Station – Broken Sword Walkthrough
In this part of the Broken Sword walkthrough, head to the police station and speak to Moue, the gendarme you met earlier at the bombed cafe. Discuss Marquet, the thugs at the Ubu, Khan, and the scar-faced man with him. Then, leave the police station and proceed to the Hagenmeyer Hospital.
Part 2: Hagenmeyer Hospital – Broken Sword Walkthrough
Enter the hospital lobby through the glass doors and engage in a conversation with the receptionist. Inquire about the clown, Guido and Flap, and Jacques Marquet. When she asks if you are related to Marquet, reply “No” and show her your ID. Marquet is located in the J-Two Ward, specifically Nurse Grendel’s ward. However, getting past Nurse Grendel won’t be an easy task.
Once you have finished asking about Nurse Grendel, proceed down the left hallway and talk to the old janitor, Sam. Inquire about Grendel, Guido and Flap, and the floor polisher, Mr. Shiny. Exhaust all conversation options with Sam, then go to the front, to the left of the screen, past the water cooler. Notice the plug for Mr. Shiny in the outlet at George’s right? Unplug it.
When Sam goes back and plugs Mr. Shiny back in, you’ll have enough time to slip into the closet (red door next to Mr. Shiny) and change into a doctor’s white coat.
You won’t be able to go anywhere in the wards yet, so use the uppermost right screen exit, behind Sam, to return to the hospital lobby. Approach the old man with the white mustache, Dr. Hagenmeyer. Afterward, go back down to the wards where you found Sam. Benoir, the nephew, will follow you, and you’ll end up in Grendel’s ward, J-Two, where Marquet is supposedly recovering. The stern Nurse Grendel will give you instructions and provide you with a BLOOD PRESSURE CUFF.
Engage in conversations with the patients in the ward. The man in the middle bed will inform you that Marquet’s room is around the corner in solitary. After speaking to all the patients, try to go to the front screen and right towards Marquet’s room. However, the patient in the first bed will stop you. After the unsatisfactory encounter, talk to Benoir at the foot of the bed. Ask him about Marquet and Grendel. Give Benoir the blood pressure cuff and instruct him to use it on the man pictured in the center icon at the bottom of your screen, Eric Sopmarch. Benoir will then take Eric’s blood pressure.
Go to the extreme right of the screen and enter Marquet’s room, where the guard is seated. Marquet desperately wants you to deliver the gem to the Grand Master. He reveals that Flap and Guido are working for him. The assassin is attempting to prevent the reforging of the Templar sword and is likely in Syria, searching for Klausner.
Leave the room and outside, Benoir will give you the blood pressure cuff. After the cut scene and Marquet’s death at the hands of a fake doctor, you will reappear in Nico’s apartment.
Engage in a conversation with Nico about the Hashshashin and the murder of Marquet at the Hagenmeyer Hospital.
Part 3: Crune Museum – Broken Sword Walkthrough
Inside the museum, engage in a conversation with the guard about the tripod, the alarm system, the Templars, the coin collection, and Philip le Bel.
Proceed to talk to Andre Lobineau, who is standing by the windows. Inquire about the Hashshashin, Montfaucon, Peagram, Philip le Bel, the manuscript, the Templars, Nico, and the tripod. However, Lobineau is unwilling to lend you the Lochmarne tripod.
After having a lengthy conversation with Lobineau and learning about Philip le Bel and the supposed eradication of the Templars, show him the matchbook and discuss Alamut and Persia. Ask him about the gem, although it seems he has no knowledge of it.
Save your game at this point.
When the guard is not looking (he should be up by the front entrance), open the top left window of the bank of windows above Lobineau. As the guard goes to close it, quickly hide in the sarcophagus located to the back and right of the tripod’s glass case. Observe as Lobineau and the guard close up the museum for the day. Watch the cutscene where Flap and Guido enter to steal the tripod.
Once you regain control of the cursor, immediately click on the totem pole to the right of George’s position. George’s actions won’t go too well, and neither will Flap and Guido. However, Nico will come to the rescue and grab the tripod.
Back at Nico’s apartment, George and Nico discuss Lobineau, the TRIPOD, and the gem. They also reflect on the events that took place at the museum. Review the topic of the Templars again and take another look at the manuscript before George excuses himself and leaves for the next destination.
Part 4: Montfaucon – Broken Sword Walkthrough
Part 1: The Plaza
Initiate a conversation with the police officer at the sidewalk table. Inquire about the Templars and their duties directing traffic. Proceed to talk to the juggler and ask him about the Templars and juggling. Give juggling a try yourself. Return to the policeman and show him the red nose of the clown assassin. Discuss the juggler with the officer. Once you’re done, go back and attempt juggling again. George will wear a red nose, humiliating the juggler and causing both the juggler and the police officer to leave the plaza.
Once they have departed, use the T-shaped tool on the manhole cover in front of the tourists. A hidden underground river with caverns or something similar is revealed.
Part 2: The Caverns
Click on the right-hand archway and cross the bridge. Use the T-shaped manhole key to break through the center of the archway. Pull the lever inside the archway twice. Proceed to the boat and unwind the chain. Pick up the hook on the chain and attach it to the wheel mechanism in the archway. Return to the boat and rewind the chain. Go through the archway, passing behind the exposed machinery. You will now find yourself in the caverns.
Go back to one screen and look through the hole in the rock to witness a secret meeting of the Templars. It becomes evident that they are attempting to reforge the broken sword of Baphomet and revive the Templars, albeit this specific fringe group of the ancient order. You will finally catch a glimpse of the Grand Master.
Look through the hole once again to hear the Grand Master’s plan to become the Prince of the World. The mysterious group then sails away in a small boat.
Proceed down the long series of steps, leading to an intriguing ceremonial circle. Place the tripod on the center post and position the gem on the tripod. The letters M A R I B will be revealed.
Back at Nico’s apartment, discuss the events of your trip to Montfaucon with her. Nico agrees to keep the gem and anonymously return the tripod to Andre Lobineau at the museum. Leave the apartment and prepare for the next destination: SYRIA.
Part 5: Marib, Syria – Broken Sword Walkthrough
Part 1: Marketplace
Approach and engage in a conversation with the kid standing to George’s right, Nejo. Inquire about the Templars, knights, and his stand. Ask about Nejo himself and his stand once more.
Once the conversation options are exhausted, show Nejo the red ball acquired from the juggler at Montfaucon. Nejo becomes enamored with it and offers a trade. Remember this offer.
Proceed to talk to the fat man in the green and yellow outfit, Duane Henderson. Inquire about Nejo, Templars, medieval weaving, the knight, and eventually Duane himself. On the second round, ask about his wife, Pearl, and then inquire about himself again.
Head over to Pearl at the nearby antique shop and discuss medieval weaving, herself, Duane, the Templars, and Nejo. She may offer to share one of her poems with you, but it is not necessary to listen to it to progress in the game.
Move to the screen’s extreme right, where a darkened stairway can be found in an arch. Ascend the stairs and observe the carpet seller. Notice the diamond-patterned red rug behind him, reminiscent of the matchbook in your inventory. The carpet seller mentions Alamut, a place Marquet mentioned at the hospital. The carpet seller reveals a hidden set of steps by pulling back the carpet. Ascend the steps to reach Club Alamut.
Engage in a conversation with Ultar, the taxi driver. Then ask about the bartender, Nejo, Templars, and the American tourists. Attempt to talk to the bartender, but he will not respond due to having his tongue removed.
Try the door to the right, which happens to be locked. According to Ultar, it leads to the bathroom. Use the magnifying glass to examine the note on the door while George is standing in front of it. Return to Ultar and discuss the sign on the bathroom door. There seems to be some issue involving a stolen toilet brush. Show Ultar the picture of Khan and discuss Bull’s Head when the option becomes available. Let Ultar know that you definitely want to go there. Finding the missing toilet brush might grant you access to the bathroom and make Ultar more agreeable about the $50.00 taxi ride.
Return to the marketplace and proceed to the kebab stall. Use the magnifying glass to examine the kebabs carefully. Notice the toilet brush located under the roasting kebabs to the left. It seems that the kebab salesman, Arto, is using the toilet brush from Alamut to baste his kebabs.
Move to the extreme left screen and talk to Nejo about the Americans, Ultar, and the kebab salesman, Arto. Show Nejo the red ball once again. He mentions an Arabic phrase, “il ak kl’ klab,” and suggests you use it on Arto.
Note: It is essential to have right-clicked on Arto at the kebab stand and heard George’s thoughts about the toilet brush before giving the ball to Nejo.
Once you have the Arabic phrase from Nejo, approach Arto and left-click on him. Use the Arabic phrase icon. This results in a dramatic reaction from Arto. Although he goes wild, it allows Nejo to approach the kebab stand and pick up the toilet brush. Nejo has performed a service for you.
Return to the marketplace and speak to Nejo. Arto will no longer bother you. Nejo will give you the TOILET BRUSH. Go back upstairs to the Alamut and hand the toilet brush to Ultar. Then, pass it on to the owner of the Alamut. He will take the brush and give you a set of KEYS to the bathroom door.
Use the keys on the door to unlock it. Once inside, take the CHAIN from the toilet stall and use the keys on the towel machine to retrieve the ROLLER TOWEL.
Head back to Ultar and inquire about Bull’s Head and the meaning of the Arabic phrase used on Arto. It turns out that Arto’s reaction was intense because of the phrase’s significance. You still need to find a way to gather $50.00 for the taxi ride to Bull’s Head.
Return to the now content Nejo and talk to him about the smelly cat. Pet the cat and then ring the silver bell on the left side of the table. The cat will knock a small, gray statue off the top shelf behind the table. A man in a red shirt will briefly appear from the stall door. Pick up the little STATUE that fell off the table to the right of George.
Clean the statue with the soiled tissue from your inventory. It now has the appearance of an old or ancient artifact. Consider selling it to someone who appreciates ancient items, such as Duane and Pearl. Speak to Duane and offer him the statue for $50.00. He will give you the MONEY. You now have the taxi fare to Bull’s Head. Before leaving Duane, ask about Bull’s Head, Ultar, and Arto. Leave Duane and return to the Alamut to find Ultar. Show him the money and respond affirmatively when he asks if you are adventurous. Ultar will leave ahead of you, and you should leave the bathroom keys on the bar.
When you reach the truck, engage in a conversation with Ultar regarding the taxi. He will inform you that there is a problem with the fan belt. Give Ultar the roller towel obtained from the Alamut bathroom. You now have HALF A ROLLER TOWEL. Prepare for your journey to Bull’s Head.
Part 2: Bull’s Head
Upon reaching the top of Bull’s Head, save your game. Approach the little tree on the edge of the cliff. Notice the darker area to the right of the tree, which is a deep hole. Use the hand icon on the tree to obtain a STICK. Combine the stick with the half roller towel in your inventory. Walk over to the deep hole and use the towel and stick apparatus on the crack at the side of the hole. Climb into the hole using the gears icon.
Towards the back of the screen, under the rock where the little tree is located just above you, there is a hole in the rock to the left of the corner area. Use the magnifying glass icon to examine the hole. You’ll discover a wide metal ring. Pull the ring and enter the newly revealed doorway on George’s right.
Inside, you find Klausner’s body. However, the door closes, and you are locked in. Investigate Klausner’s body and find a hard LENS. Save your game. Examine the Baphomet image and try to memorize the inscription, which translates to “to the west, to the edge of the world.” Your examination is interrupted by Kahn. Follow him outside.
During the conversation with Kahn, if you have an inkling of what might be beneficial, use the angel icon to answer all of his questions truthfully. Then, offer to “die like a man.” When it is time to shake hands with Kahn, quickly retrieve the palm buzzer from the costume shop in your inventory and use it on Kahn to shake hands. Immediately run to the edge of the cliff and jump off. If you are fast enough, you will land on Ultar’s truck, and you will head back to Paris.
Part 3: Paris
Upon returning to Nico’s apartment, discuss the events in Marib and proceed to the Crune Museum.
Talk to Lobineau about the Baphomet inscription. Inquire about Philip le Bel and Pope Clement, including their plot to obtain the Templar’s treasure. Ask Lobineau about the manuscript. You discover that the knight is Spanish, hinting that the manuscript may be a map of the hidden Templar treasure buried in Spain. Head to the airport and select Villa De Vasconcellos as your destination.
CHAPTER SIX – SPAIN – Broken Sword Walkthrough
Part 1: The Villa
Talk to Lopez, the gardener watering the lawn. Inquire about the Templars and the Countess de Vasconcellos. However, it seems that Lopez is unwilling to let you see the Countess. He denies your request.
Move towards the side of the villa. Look for a gears icon on the hose just below the spot where it goes through the window. Use the blood pressure cuff on the hose.
When the gardener discovers your trick and goes into the villa’s laundry room, quickly follow him inside. Proceed down the corridor to the right of the suit of armor. Once the dogs start barking, George will automatically retreat to the corridor. As soon as you regain control, click on the suit of armor. George will hide behind it. Stay hidden until the old gardener calms the dogs and continues down the corridor. Seize the opportunity to make your way up the stairs.
Speak to the reluctant Countess about the Templars. Learn that she is the last of the Vasconcellos line. Inquire about the replacement piece for the 600-year-old chess set.
Part 2: The Mausoleum
Go left on the screen and examine the Bible. Underneath, you’ll find a checkerboard pattern. Discuss your finding with the Countess. It seems that the chess pieces must fit into the chessboard on the altar.
The Countess orders Lopez to retrieve the chess set from her quarters. While waiting, she shares the local legend of the children’s disappearance and Don Carlos’ quest to find them.
Note: When the Chess Puzzle appears on your screen, follow these steps:
- The puzzle doesn’t function like a regular chess game.
- You will only deal with the three white pieces in the center vertical column: the Bishop, the Knight, and the King. You can only move these three pieces.
- Click on the square base of the pieces, not the figures themselves.
CHESS PUZZLE SOLUTION:
There are five vertical squares in the center column. Number them 1, 2, 3, 4, and 5 from top to bottom.
The Bishop (with a cross) goes in square #1. The Knight (with a hood) goes in square #3. The King (with a crown) goes in square #4.
Once you solve the puzzle, a niche in the wall will open, revealing a significant ancient chalice.
Return to Nico’s apartment to discuss your trip to Spain. Then, prepare for your next destination.
CHAPTER SEVEN – MONTFAUCON RETURN
Part 1: The Plaza
Speak to the police officer once again. He is now undercover on the Sewer Jacques case.
Proceed up the stairs and enter the church. Show the cleaned chalice to the priest and allow him to clean it further. While he’s occupied, move to the right screen and examine the floor tombs under the windows. Also, inspect the wall tombs. Then, look at the scroll or manuscript held by the standing statue near the priest.
Right-click on the cross symbol on the statue’s chest. George will make a comment about the statue “holding a staff and a scroll.” Next, right-click on the manuscript to obtain a gears icon and view a close-up of a section of the stained glass windows.
Use the lens on the scroll, then examine the windows once more. You will see an image of a knight burning alive, likely a Templar. Additionally, an important date is visible: MCCCXIV, which translates to 1314.
Speak to the priest again and learn that the cleaned chalice bears a winged horse, and a Pegasus coat of arms identical to one found on a tomb in the sanctuary. Head back to the main area and examine the wall tomb closest to the new window. You have identified the Pegasus symbol, indicating the resting place of Don Carlos Vasconcellos.
Part 2: Crune Museum
Return to Andre Lobineau and discuss the 14th-century communion chalice. Inquire about the Baphomet statue, although Lobineau doubts that the Templars worshipped such idols. Once you have finished discussing the Baphomet statue, leave and access the map to proceed to the next location.
Part 3: Site de Baphomet
Speak to the lazy workman who is taking a smoke break. Ask him about the Templars and inquire about his responsibilities. He seems puzzled by the appearance of people with access to the excavation site. Leave him and head through the gate to the right and down the steps into the cellar. Speak to the guard and ask him about the Templars and his duties.
Search for the locked bathroom door. Talk to the guard again and request him to open the bathroom for you. He will give you his KEYS. Open the bathroom door and step inside. Examine the boiler, toilet, and garbage. Retrieve the BAR OF SOAP from the sink (the icon to pick it up can be a bit tricky).
Now, use the bar of soap to make an impression of the keys. Combine the keys and the soap in your inventory. You now have a good impression of the key. Use the soap on the plaster to create a plaster key. Hold the soap bar under the water to moisten the plaster. Take the moistened plaster key to the hand dryer to dry it. Replace the soap. You now have a realistic-looking plaster key.
Return to the guard and give him the real key. Proceed up the stairs and attempt to get some gray paint on the key from the paint can hanging on the yellow and black barricade. Be cautious, as the workman may become upset. Go back down to the cellar and use the phone to call Nico. Ask her to distract the guard while you set up the painter to move him away from the paint can. Approach the painter and inform him about the phone call. He won’t be able to resist answering it. Once he is gone, retrieve the key and dip it into the paint.
Return to the cellar and retrieve the bathroom key from the guard. Enter the bathroom and swap the fake key for the real one. Keep the fake key and return to the thermostat on the wall to the left of the radiator. Right-click on it to receive an explanation. Then, speak to the guard about the thermostat. Go turn the thermostat off. Right-click on the thermostat again to hear that it’s getting “chilly.” The guard will put on his gloves. Now, give him the fake key. He won’t be able to tell that it is fake with his gloves on.
Call Nico again and ask her to distract the guard once more. Wait until he goes up to assist the painter. Observe the argument between the guard and painter, then return to the cellar.
Use the real key on the excavation door. Examine the Baphomet idol. Use the chalice on the design on the floor in front of the idol. An image of a church with a square tower will appear.
Back at Nico’s apartment, discuss the events with her. It seems like a trip to Spain is in order.
CHAPTER EIGHT – RETURN TO SPAIN
Part 1: The Villa
Return to the villa and speak with Lopez. He is more cooperative now. Ask him about the chalice and the Countess. Enter the house and stop by the laundry room. Pick up the white patch on the wall, which turns out to be a MIRROR.
Go upstairs and talk to the old Countess. Inquire about the missing chess piece, herself, the Bible references, and the chalice. Remember there’s a Bible in the mausoleum. Head down to the mausoleum, located to the right of the palm tree in front of Lopez.
Part 2: The Mausoleum
Open the mausoleum door and take the BIBLE from the altar. Give the Bible to the Countess. She will search for references related to the hiding place, the well, hidden things, lions, and the horn of unicorns. This might provide clues to a hidden, ancient well on the villa’s property.
Return to Lopez and ask him about the well again. He suggests using water dowsing to locate it. Find a hazel tree beside the laundry room window and take the forked HAZEL STICK. Bring the stick back to Lopez for instructions. Eventually, you will come across a tin can full of water, which accidentally leads you to the ancient well.
Save your game.
Inside the well, examine the lion’s head and move the fang in its jaw. Quickly jump back to avoid danger. Proceed through the exposed doorway. You’ll find a stone wall. Use the mirror on the back wall of the well beside the rope. Return to the now-illuminated wall and discover a socket. Insert the strange key into the socket. Behind the second secret door, you uncover the secret hiding place of the Templars, the lost children, and the missing chess piece. It’s a somber revelation.
Back at Nico’s apartment, find her with Andre Lobineau. Engage in a lengthy conversation based on the clues gathered so far. Then, prepare to embark on the next chapter.
CHAPTER NINE – BANNOCKBURN
Part 1: On the Train
Talk to Nico and attempt to leave. The conductor will arrive to check the tickets. Leave the compartment and proceed left down the aisle until you encounter Guido. After learning that Eklund and the conductor are the same person, return to Nico’s compartment (located just before a locked door between cars). Upon reaching the compartment, you discover that Nico and the strange woman are both missing. Enter the compartment where you see a man wearing a black and white cap.
Speak to the man in the hat about Nico, Guido, and the strong ale he’s drinking. Open the window behind George and climb up on top of the train. Save your game. Move right along the train and enter the baggage car, which is just one car over.
As Guido gets thrown out of the door and the strange woman is shot and ends up in the corner, quickly pull the emergency cord on the left wall inside a small wooden frame.
You will have a conversation with Kahn, a long-time secret friend, who imparts more information about the Templars before departing. Attempt to leave the train. Speak to Nico, untie her, and exit the train on the left side.
Part 2: The Castle broken sword walkthrough
To begin your adventure, enter the castle and carefully examine the door on the right. Afterwards, take a closer look at the eyeless demon statue positioned next to the door. As you proceed, attempt to turn the handle on the winch, but encounter a setback as it unexpectedly comes off. However, don’t be discouraged! You can salvage the situation by collecting the winch handle, a cog, and spindle from the winch, as well as a broken clay pipe from the nearby dirt pile. Additionally, be sure to gather a metal coin, another small cog and spindle, and a plastic pen top.
Now equipped with these items, it’s time to put them to good use. Begin by utilizing the cog and spindles to restore the demon statue’s eyes to their former glory. Then, carefully place the winch handle on the right side of the statue.
As you push forward and enter the open door, you’ll find yourself amidst an intriguing ceremony involving Eklund and Inspector Rosso. Take a moment to observe this scene, where you bear witness to the dramatic reforging of a broken sword and the Grand Master’s triumphant return to full power. However, tensions rise as Eklund attempts to strangle George, only to be thwarted by the timely intervention of Inspector Rosso, who brandishes a knife. Tragically, the situation takes a turn for the worse as the Grand Master retaliates by shooting Rosso. In a desperate bid to escape, George and Nico seize the opportunity and make a hasty retreat.
But the danger isn’t over yet! Prepare for a thrilling confrontation with Guido at the entrance of a cave. React swiftly by seizing the torch hanging on the wall to George’s right, and with nerves of steel, hurl it into the old spilled dynamite nearby. Witness as the flames sputter and spark, creating a tense but non-explosive spectacle. Capitalizing on this distraction, Nico expertly tosses a handbag full of C4 into the fiery chaos.
Congratulations! Your unwavering bravery has ensured the survival of George and Nico, at least long enough to embark on further adventures in the exciting Broken Sword series. I hope this Broken Sword Walkthrough helped.
Unleash Your Inner Adventurer with the Captivating Broken Sword Trilogy On PC!
Review:
Step into a world of mystery, intrigue, and pulse-pounding adventure with the legendary Broken Sword Trilogy for PC. This captivating collection is an absolute must-have for any avid gamer, and it’s bound to leave you spellbound from start to finish. Prepare to embark on a journey that will challenge your wits, captivate your imagination, and keep you on the edge of your seat!
The first installment, Broken Sword: The Shadow of the Templars, introduces us to the iconic characters of George Stobbart and Nico Collard. As you navigate through stunning hand-drawn locations, you’ll unravel a sinister conspiracy that stretches across centuries. The engaging storyline is enhanced by cleverly crafted puzzles that will test your problem-solving skills, providing an immersive experience that will leave you craving for more.
In Broken Sword II: The Smoking Mirror, the adventure continues with even more twists and turns. The chemistry between George and Nico is undeniable, and their banter adds an extra layer of charm to the already captivating narrative. From ancient Mayan ruins to exotic locations, every scene is beautifully rendered, immersing you deeper into the heart of the mystery. The puzzles are challenging yet rewarding, ensuring hours of engrossing gameplay.
The trilogy reaches its grand finale with Broken Sword III: The Sleeping Dragon. This installment takes the series to new heights with its cinematic presentation and enhanced gameplay mechanics. The seamless transition from 2D to 3D environments adds a fresh perspective, creating a visually stunning world to explore. Brace yourself for a thrilling and emotionally charged conclusion that will leave you breathless.
What sets the Broken Sword Trilogy apart from other games is its expertly crafted storytelling. The intricate plot, rich character development, and unexpected twists and turns keep you engaged and invested in the outcome. You’ll find yourself eagerly anticipating each new clue, fully immersed in the world created by the talented team at Revolution Software.
But it’s not just the gripping storyline that makes the Broken Sword Trilogy a must-play. The carefully designed puzzles strike the perfect balance between challenge and satisfaction. Each solution brings a sense of accomplishment, rewarding your critical thinking and problem-solving abilities. It’s this balance that keeps you motivated to push forward, even in the face of seemingly insurmountable obstacles.
As an affiliate link, buying the Broken Sword Trilogy through Amazon not only grants you instant access to this gaming masterpiece but also supports the talented developers who brought it to life. So why wait? Unleash your inner adventurer and embark on an unforgettable journey with the Broken Sword Trilogy for PC. Your mind will be captivated, your senses thrilled, and you’ll be left wanting more! Also, come back here if you get stuck as we will be adding more broken sword walkthrough guides soon.
(Note: This review contains an affiliate link. By making a purchase through this link, you’ll be supporting the author of this review at no additional cost to you.)